 Hardcoded subtitles are subtitles that are added to a video itself. This involves adding text to the media content and exporting it. After doing this, your chosen video will have subtitles for life. This is different from downloading a separate .srt or subtitle file to a video player. Doing that might cause issues with timing or with how it’s displayed depending on what player you use, which is why hardcoded subtitles are much more preferred by other groups of people. In this guide, we’ll discuss the best software that you can use to hardcode subtitles in any video you want.
You might also like: Apps to Watch Movies on iPad
Best Software to Hardcode Subtitles
Ever wanted to watch a movie but it was too inaudible? Or to watch a YouTube video but can’t understand it well because there aren’t any provided captions? We feel you.
Subtitles are a powerful tool in making media, specifically video-type media, accessible to everyone. On streaming platforms, they are considered a must, especially subtitling foreign languages to make this content truly for everyone. However, what will people do if they can’t always use online streaming platforms? This is where hardcoded subtitles come in.
1. VLC Media Player
VLC Media Player is one of the most accessible and flexible video players that you can use. One feature that people may not know about the software is that you can also add hardcoded subtitles to videos using this free, open-sourced software. It is also the most optimal multimedia player because it supports a wide variety of media formats without any problem.
To hardcode subtitles into videos on VLC Media Player, simply do the following:
1. Open the VLC Media Player and add your chosen video
To select and edit the video if you want to add subtitles to, you will need to use the Stream option. To do this, you can hover your mouse over the “Media” tab. Another way to access the option is by pressing the hotkey combination ‘CTRL + S.’ After a new screen pops up, click the ‘Add’ button and select your chosen video.
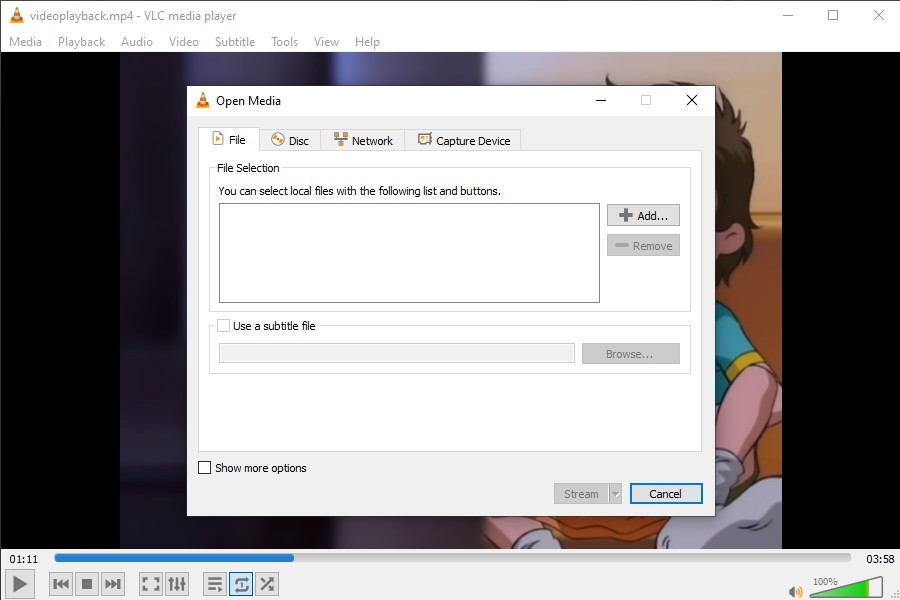
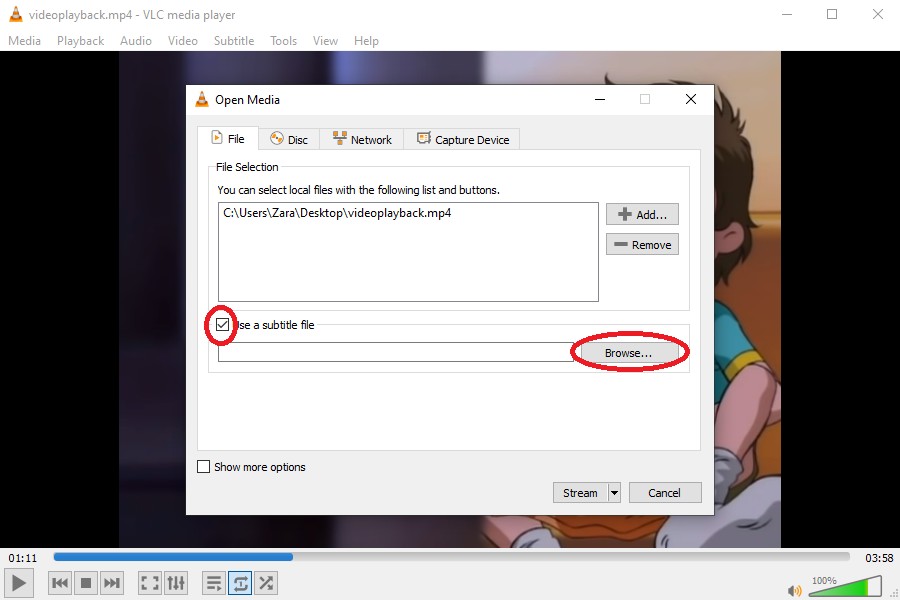
2. Add the subtitles you want to hardcode
To add the subtitles to the video you want, you will need to upload a .srt file, which will contain the timed subtitles assigned for your chosen media. To do this, check the box labeled ‘Use a subtitle file and click on ‘Browse.’ Choose the .srt file you need.
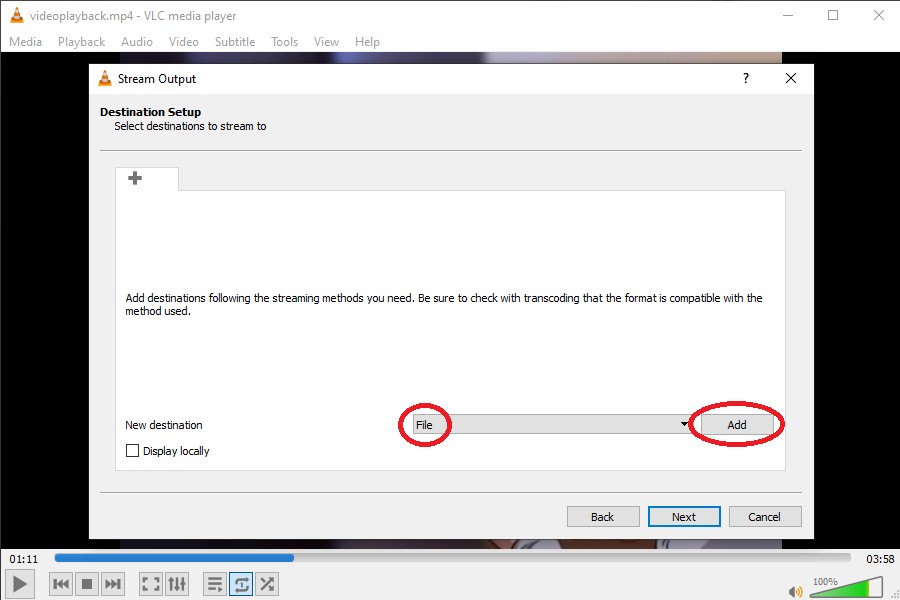
3. Choose a location to export your file to
Congrats! You’re almost done with using one of the best software to hardcode subtitles onto your chosen video. You now have to choose a location for your file. Select the ‘File’ button from the dropdown menu. Then, click on ‘Add’ to input your desired file location for it.
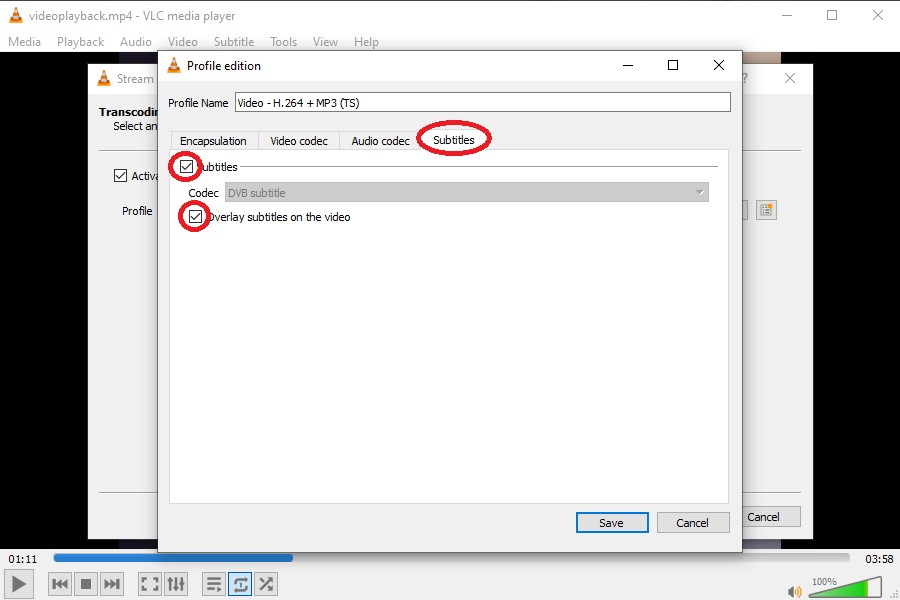
4. Select the Transcoding Subtitles option
The final step in this process is to select the ‘Transcoding subtitle’ checkbox. Select your desired video profile, and click on the wrench icon next to it. After this, select the ‘Subtitle’ category at the top of the menu. Tick off both the ‘Subtitles’ and “Overlay subtitles on the video’ boxes and press save.
You might also like: 7 Must-Watch Cyber Security Related Movies on Netflix
2. HandBrake
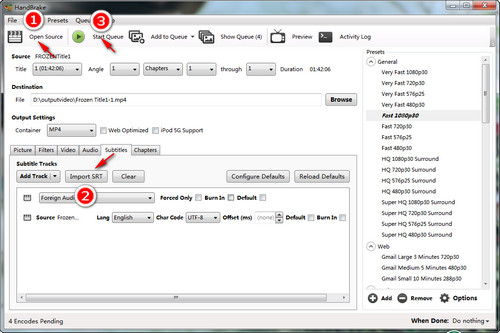
HandBrake is a similar application to VLC Media Player, so the process of adding subtitles to your videos is also similarly easy and hassle-free. Like VLC, HandBrake is another open-source tool that the public can use for free. The primary use of Handbrake is to convert different media into other media formats. However, it can also be used to add hardcoded subtitles to videos.
Here’s how to do it:
- Open HandBrake and add the video file you want to add subtitles to
- Select the video format of your video. If your video is in MKV or MP4 format, select the applicable one as your output format
- Select the ‘Subtitles’ Tab
- Select the ‘Import SRT’ button and add your chosen .srt or subtitle file
3. VEED (and other video editing software)
If you prefer using a dedicated video editing software to add subtitles, you can do so on VEED. VEED is a highly accessible video editing software that is minimalist, sleek, and modern, making it a good option for those who want an all-in-one platform without too many complicated features to navigate around.
Unlike some other video editing platforms, VEED allows you to import .srt files so that you won’t have to transcribe and manually add subtitles to your videos. Moreover, you’ll have more control over how your subtitles look because you can edit the font size, font style, and color.
Here’s how to add subtitles on VEED:
1. Select your video
You can choose to edit your video first, but when using an .srt file, it is advisable to edit afterward to prevent any delays or mistimings in the subtitles being applied.
2. Add you subtitles
VEED allows you to choose three different ways ot add subtitles to your video. You can manually add them yourself, which consists of typing and editing the timeframe of your subtitles. The second is by auto transcribing, which allows the VEED software to interpret the video’s audio and transcribe it instantly. The final, and most reliable method is through importing an .srt file, like in VLC or Handbrake
3. Export your subtitled video
Once you’re happy with how your subtitles look, you can export your video and share it on your preferred social media platforms.
/Add-Subtitles-to-Video.png)
There are a large number of video editing software that functions in the same way VEED does. You can also import .srt files to add subtitles in platforms like Adobe Premiere Pro or Final Cut Pro. It’s all a matter of preference.
You might also like: How to Turn Off CC on ESPN App


